Smart Car Robot จะแบ่งส่วนของการทำงานเป็น 2 ส่วน คือ Controller และ Smart Car Robot การทำงานของ Controller จะทำหน้าที่ควบคุม Car Robot เดินหน้า ถอยหลัง และเลี้ยวซ้ายขวา โดยส่งค่า F(Forward), B(Backward), L(Turn Left) และ R(Turn Right) เมื่อ Car Robot ได้รับจะตรวจสอบข้อมูลที่ได้ ถ้าตรงเงื่อนไขที่กำหนดไว้จะทำงานตามคำสั่ง
อุปกรณ์/เครื่องมือที่ใช้
- NodeMCU v 1.0
- Arduino UNO R3
- Motor Drive Shield dual L293D ( ข้อมูลเพิ่มเติม https://learn.adafruit.com/adafruit-motor-shield )
library https://github.com/adafruit/Adafruit-Motor-Shield-library/archive/master.zip
ขั้นตอนการนำ library ไปใช้งาน ดาวน์โหลด --> Extract file --> เปลี่ยนชื่อโฟลเดอร์เป็น AFmotor --> คัดลอกโฟลเดอร์ไปที่ $PATH/Arduino/libraries - Smart Car 2WD Robot Car Chassis for Arduino
- LED และ Resistors 1k
การออกแบบ และการทำงาน
Smart Car Robot สามารถควบคุมได้หลาย Controller ซึ่งหมายความว่าหลายๆคนสามารถที่จะควบคุม Car Robot คันเดียวได้พร้อมๆกัน แต่จะทำงานตามลำดับคำสั่งที่ได้รับมา ใครบังคับก่อนก็ทำงานก่อน
Source code : https://github.com/anunpanya/smartcarrobot
Controller
กำหนด parameter
sendevent เก็บ interval สำหรับ delay การส่ง message เพื่อไม่ได้เกิด message rate ที่ NETPIE กำหนด
ctrlEvent เก็บปุ่มที่กำลังกด ณ ขณะนั้น
ctrlButton เก็บตัวแปรของปุ่ม ใช้เช็ค event keyCode ของปุ่มที่กด ณ ขณะนั้น
ctrlString ใช้แสดงข้อความขณะที่กดปุ่ม
microgearonline เก็บสถานะ online ของ controller
var sendevent; | |
var ctrlEvent = ''; | |
var ctrlButton = {'38':'F','40':'B','37':'L','39':'R'}; | |
var ctrlString = {'F':'Forward','B':'Backward','L':'Turn Left','R':'Turn Right'}; | |
var microgearonline = false; |
ฟังก์ชั่น sendEvent จะทำงานตามเงื่อนไขก็ต่อเมื่อ controller เชื่อมต่อ NETPIE และ microgear.chat คำสั่งที่กำลังกดอยู่ ถ้ายังกดอยู่ภายใน 200 มิลลิวินาที จะส่งคำสั่งเดิมไปเรื่อยๆจนกว่าจะเลิกกด
function sendEvent(ev){ | |
if (microgearonline) { | |
ctrlEvent = ev; | |
document.getElementById("des").innerHTML = ctrlString[ev]; | |
microgear.chat("robotcar",ctrlEvent); | |
sendevent = setInterval(function(){ | |
microgear.chat("robotcar",ctrlEvent); | |
},200); | |
} | |
} |
ฟังก์ชั่น touchstart เป็นฟังก์ชั่นสำหรับเช็ค event ที่มีการกดปุ่ม ถ้าตรงเงื่อนไขที่กำหนด จะ clearInterval ของ sendevent และส่งคำสั่งเข้าฟังก์ชั่น sendEvent ปุ่มที่กดบนหน้าจอแสดงผลจะเป็นสีเหลือง
function touchstart(e) { | |
e = e || window.event; | |
if ((e.keyCode == '38' || e.keyCode == '40' || e.keyCode == '37' || e.keyCode == '39') && ctrlEvent!=ctrlButton[e.keyCode]) { | |
clearInterval(sendevent); | |
sendEvent(ctrlButton[e.keyCode]); | |
document.getElementById(ctrlButton[e.keyCode]).style.backgroundColor = "yellow"; | |
}else if ((e == 'F' || e == 'B' || e == 'L' || e == 'R') && ctrlEvent != e) { | |
document.getElementById(e).style.backgroundColor = "yellow"; | |
clearInterval(sendevent); | |
sendEvent(e); | |
} | |
} |
ฟังก์ชั่น touchend เป็นฟังก์ชั่นสำหรับเช็ค event ที่มีการกดปุ่มเสร็จ จะ clearInterval ของ sendevent และถ้าตรงเงื่อนไขที่กำหนดปุ่มกดบนหน้าจอแสดงผลจะเปลี่ยนเป็นสีขาว
function touchend(e) { | |
e = e || window.event; | |
clearInterval(sendevent); | |
ctrlEvent = ''; | |
document.getElementById("des").innerHTML = ''; | |
if (e.keyCode == '38' || e.keyCode == '40' || e.keyCode == '37' || e.keyCode == '39') { | |
document.getElementById(ctrlButton[e.keyCode]).style.backgroundColor = "#FFF"; | |
}else if (e == 'F' || e == 'B' || e == 'L' || e == 'R') { | |
document.getElementById(e).style.backgroundColor = "#FFF"; | |
} | |
} |
ฟังก์ชั่น microgear.on(‘message’,function()) เอาไว้เช็คสถานะ Smart Car Robot พร้อมทำงานตามคำสั่ง สีของข้อความ Online จะเปลี่ยนสีสลับกันไปเรื่อยๆ
var online = 0; | |
microgear.on('message', function(topic,data) { | |
if(data=="O"){ | |
if((online%3)==0) | |
document.getElementById("state").style.color = "red"; | |
if((online%3)==1) | |
document.getElementById("state").style.color = "green"; | |
if((online%3)==2) | |
document.getElementById("state").style.color = "blue"; | |
online++; | |
} | |
}); |
ฟังก์ชั่น microgear.on(‘connected’,function()) ทำงานเมื่อเชื่อมต่อกับ NETPIE จากนั้นจะตั้งชื่อ เปลี่ยนสถานะของ Controller จาก Offline เป็น Online
microgear.on('connected', function() { | |
microgear.setname('controller'); | |
document.getElementById("state").innerHTML = "Online"; | |
document.onkeydown = touchstart; | |
document.onkeyup = touchend; | |
microgearonline = true; | |
}); |
ฟังก์ชั่น microgear.on(‘disconnected’,function()) เมื่อหลุดการเชื่อมต่อ NETPIE อาจจะเป็นสาเหตุที่ network มีปัญหา ณ ขณะนั้น จะเปลี่ยนสถานะของ Controller จาก Online เป็น Offline
microgear.on('disconnected', function() { | |
document.getElementById("state").innerHTML = '<font style="color:#c0c0c0">Offline</font>'; | |
microgearonline = false; | |
}); |
html แสดงผลปุ่มควบคุม
<div id="state"><font style="color:#c0c0c0">Offline</font></div> | |
<div> | |
<div id="F" onmousedown="touchstart('F')" onmouseup="touchend('F')" ontouchstart="touchstart('F')" ontouchend="touchend('F')">F</div> | |
</div> | |
<div> | |
<div id="L" onmousedown="touchstart('L')" onmouseup="touchend('L')" ontouchstart="touchstart('L')" ontouchend="touchend('L')">L</div> | |
<div id="B" onmousedown="touchstart('B')" onmouseup="touchend('B')" ontouchstart="touchstart('B')" ontouchend="touchend('B')">B</div> | |
<div id="R" onmousedown="touchstart('R')" onmouseup="touchend('R')" ontouchstart="touchstart('R')" ontouchend="touchend('R')">R</div> | |
</div> | |
<div id="des"></div> |
Smart Car - NodeMCU
onMsghandler ถ้ามีข้อความถูกส่งเข้ามาตรงตามเงื่อนไขที่กำหนด สถานะ led จะกระพริบ และ print ข้อความออกทาง serial
void onMsghandler(char *topic, uint8_t* msg, unsigned int msglen) { | |
if(msg[0] == 'L'){ | |
Serial.println("L"); | |
digitalWrite(ledD1, HIGH); | |
delay(100); | |
digitalWrite(ledD1, LOW); | |
} | |
if(msg[0] == 'R'){ | |
Serial.println("R"); | |
digitalWrite(ledD1, HIGH); | |
delay(100); | |
digitalWrite(ledD1, LOW); | |
} | |
if(msg[0] == 'F'){ | |
Serial.println("F"); | |
digitalWrite(ledD1, HIGH); | |
delay(100); | |
digitalWrite(ledD1, LOW); | |
} | |
if(msg[0] == 'B'){ | |
Serial.println("B"); | |
digitalWrite(ledD1, HIGH); | |
delay(100); | |
digitalWrite(ledD1, LOW); | |
} | |
} |
onConnected เมื่อเชื่อมต่อ NETPIE สำเร็จ จะตั้งชื่อ Smart Car Robot โดยใช้ microgear.setName()
void onConnected(char *attribute, uint8_t* msg, unsigned int msglen) { | |
microgear.setName("robotcar"); | |
} |
setup() เบื้องต้นจะผูก event MESSAGE และ CONNECTED กับ function ที่สร้างเอาไว้ เมื่อเชื่อมต่อ Access Point ได้แล้วจะทำการเชื่อมต่อ NETPIE(microgear.connect)
void setup() { | |
/* Event listener */ | |
microgear.on(MESSAGE,onMsghandler); | |
microgear.on(CONNECTED,onConnected); | |
Serial.begin(9600); | |
pinMode(ledD0, OUTPUT); | |
pinMode(ledD1, OUTPUT); | |
if (WiFi.begin(ssid, password)) { | |
while (WiFi.status() != WL_CONNECTED) { | |
delay(500); | |
//Serial.print("."); | |
} | |
//uncomment the line below if you want to reset token --> | |
//microgear.resetToken(); | |
microgear.init(GEARKEY,GEARSECRET,SCOPE); | |
microgear.connect(APPID); | |
} | |
} |
loop จะทำงานอยู่ตลอดเวลา เมื่อเชื่อมต่อกับ NETPIE ได้แล้ว สถานะ led จะสว่างถ้ายังไม่ได้เชื่อมต่อ NETPIE หรือหลุดการเชื่อมต่อ สถานะของ led จะดับ และพยายามเชื่อมต่อ NETPIE อีกครั้งทุกๆ 3000 มิลลิวินาที
timer เอาไว้นับเวลาเมื่อครบ 1500 จะส่งข้อความไปบอก controller ว่าตัวเอง Online อยู่ จะนับเพิ่มครั้งละ 100 ทุกๆ 200 มิลลิวินาที
int timer = 0; | |
void loop() { | |
if (microgear.connected()) { | |
microgear.loop(); | |
digitalWrite(ledD0, HIGH); | |
if(timer==1500){ | |
//Serial.println("Publish..."); | |
microgear.chat("controller","O"); | |
timer=0; | |
}else{ | |
delay(200); | |
timer=timer+100; | |
} | |
}else { | |
digitalWrite(ledD0, LOW); | |
microgear.connect(APPID); | |
delay(3000); | |
} | |
} |
Smart Car - Arduino UNO
Arduino UNO ต้อง include ไลบรารี่ของ AFMotor และกำหนด motor ที่ใช้งาน
#include <AFMotor.h> //import your motor shield library | |
AF_DCMotor motor1(1,MOTOR12_64KHZ); // set up motors. | |
AF_DCMotor motor2(2, MOTOR12_64KHZ); |
setup กำหนด speed ของ motor แต่ละตัวสามารถกำหนดได้ตั้งแต่ 0-255 ณ ที่นี้กำหนดให้เป็น 250
void setup() { | |
Serial.begin(9600); | |
motor1.setSpeed(250); //set the speed of the motors, between 0-255 | |
motor2.setSpeed (250); | |
} |
loop อ่านข้อมูลที่ได้จาก serial ถ้าตรงเงื่อนไขที่กำหนดไว้มอเตอร์จะทำงาน เดินหน้า(FORWARD), ถอยหลัง(BACKWARD) และหยุดนิ่ง(RELEASE)
void loop() { | |
if (Serial.available()){ | |
int inByte = Serial.read(); | |
if(inByte=='F'){ | |
motor1.run(FORWARD); motor2.run(FORWARD); | |
delay (250); | |
motor1.run(RELEASE); motor2.run(RELEASE); | |
} | |
if(inByte=='B'){ | |
motor1.run(BACKWARD); motor2.run(BACKWARD); | |
delay (250); | |
motor1.run(RELEASE); motor2.run(RELEASE); | |
} | |
if(inByte=='R'){ | |
motor1.run(BACKWARD); | |
motor2.run(FORWARD); | |
delay (250); | |
motor1.run(RELEASE); | |
motor2.run(RELEASE); | |
} | |
if(inByte=='L'){ | |
motor1.run(FORWARD); | |
motor2.run(BACKWARD); | |
delay (250); | |
motor1.run(RELEASE); | |
motor2.run(RELEASE); | |
} | |
} | |
} |
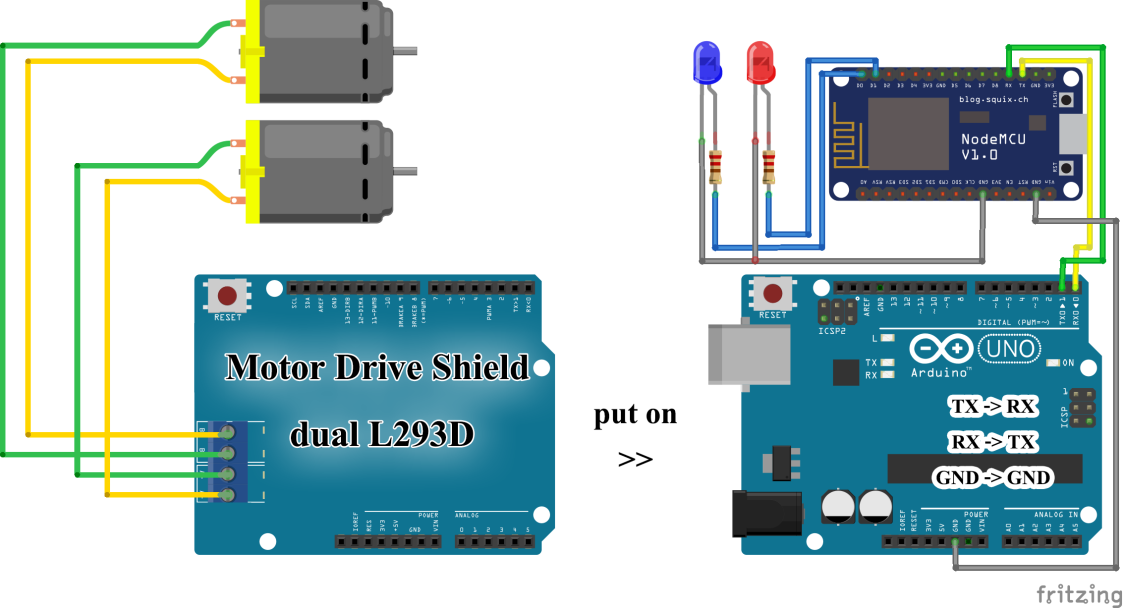
ผังวงจร Smart Car Robot
การสื่อสารผ่าน Serial ระหว่าง NodeMCU กับ Arduino UNO ต่อสาย TX --> RX , RX --> TX และ GND --> GND ส่วนมอเตอร์จะต่อขั่วต่างกันเพราะการหมุนจะได้หมุนไปทิศทางเดียวกัน ถ้าต่อขั่วตรงกันทั้งคู่ จะกลายเป็นว่ามอเตอร์แรกหมุนไปข้างหน้า อีกมอเตอร์หมุนกลับหลัง
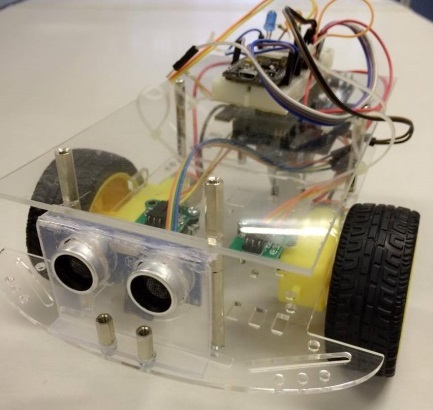
ตัวอย่างผลงาน
![]() |
![]() |
Smart Car Robot | Controller |